

Your white smile is your superpower
How can we help you today?


Restore your smile
How can we help you today?


Your smile – worry-free
How can we help you today?


Never have to worry about your oral health
How can we help you today?


Healthier smiles for the whole family
How can we help you today?


Confidence has never looked this good
How can we help you today?


Energize your smile
How can we help you today?
Products & solutions
- Featured
- Whitening
- Gums
- Kids
- Cavities
- Sensitivity
- Enamel

Colgate Total Whitening Paste Toothpaste
Colgate Total Whitening Toothpaste fights bacteria, the root cause of many oral health issues such as gingivitis, tartar, sensitivity, weak enamel, bad breath, and cavities.

Colgate® Minions™ Toothbrush
The Colgate® Minions™ Manual Toothbrush is designed for kids 5 and older with some baby and some adult teeth, as they reinforce good brushing habits.

Colgate Optic White Pro Series Battery Toothbrush
Introducing the Colgate Optic White Pro Series Battery Toothbrush. With a rubber polishing cup that removes more stains for a bright smile

Colgate Total
Colgate Total Plaque Pro Release Whitening Toothpaste dissolves and lifts away gum harming plaque with daily brushing.

Colgate Optic White Express Teeth Whitening Pen
Get your smile special-occasion ready and experience whiter teeth in just 1 day* by using the Colgate Optic White Express Teeth Whitening Pen. Powered by hydrogen peroxide, this easy-to-use and fast-acting Colgate whitening pen with a precision tip applicator offers a glowing smile after just 3 applications.
*when used as directed
Please scroll down to the Product Overview section of the page below to access the how-to-use video.
Please scroll down to the bottom of the page to access the virtual AR tool.

Optic White Pro Series Charcoal Manual toothbrush for adults
The Colgate Optic White Pro Series Charcoal Manual Toothbrush for Adults, 2 Pack is the perfect set of charcoal toothbrushes to keep teeth clean. Designed with distinctive charcoal spiral bristles, this 2 pack of charcoal toothbrushes whitens teeth by polishing away surface stains helping to whiten your smile.

Colgate® Optic White® Professional Refill Pen (6% Hydrogen Peroxide)
This professional-strength whitening serum, Colgate® Optic White® Professional Refill Pen (6% Hydrogen Peroxide) is meant to be used with the rechargeable LED whitening device that is included as part of the Colgate® Optic White® Professional Take-Home Kit.
Colgate Optic White Pro Series Battery Toothbrush
Introducing the Colgate Optic White Pro Series Battery Toothbrush. With a rubber polishing cup that removes more stains for a bright smile

Colgate Gum Care Soft Toothbrush
Gently clean sensitive teeth and sensitive gums with the Colgate Gum Care Manual Adult Toothbrush. This soft toothbrush double pack offers a gentle yet effective clean and is designed to clean along the gumline and hard to reach places.

Colgate® Peroxyl® Antiseptic Rinse, Mild Mint
The Colgate Peroxyl® mouth sore rinse helps cleanse and promote healing of minor oral irritations.
Prescription Products

Colgate® PerioGard® (Chlorhexidine Gluconate Oral Rinse USP, 0.12%)
Colgate® PerioGard Oral Rinse is a prescription-strength anti-microbial rinse to treat Gingivitis, and help the healing of inflamed gums.

Colgate 360 Gum Health Sonic Powered Battery Toothbrush
The Colgate® 360 Gum Health sonic powered toothbrush with extra soft bristles gently cleans teeth and massages gums. Try it today!

Colgate Kids Bluey Target Exclusive Gift Set
Colgate® Kids Bluey Target Exclusive Gift Set, One Children Battery Toothbrush, and Bubble Fruit Scent and Flavor Toothpaste

Colgate Minecraft Gift Set
Colgate® Kids Minecraft Toothbrush and Kids Toothpaste Gift Set. Includes Minecraft-Themed Kids Battery Toothbrush, Bubblegum Flavored Kids Toothpaste with Fluoride, Kids Manual Toothbrush and 1 toothbrush cap

Colgate Kids Unicorn Target Exclusive Gift Set
Colgate® Kids Unicorn Target Exclusive Gift Set, One Children Battery Toothbrush, and Bubble Fruit Scent and Flavor Toothpaste
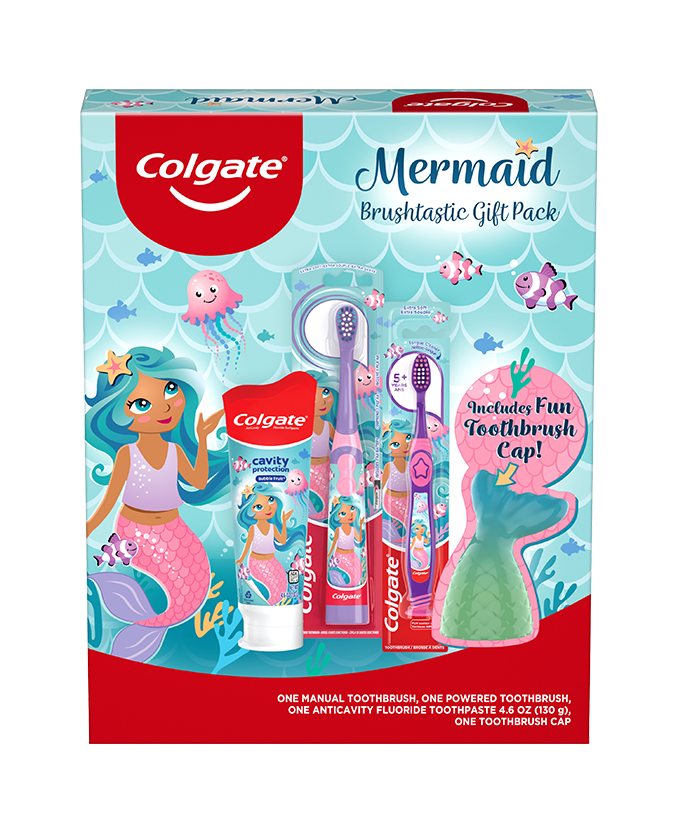
Mermaid Gift Set, 1 Powered Toothbrush, 1 Manual Toothbrush, and Toothpaste
Make teeth brushing fun for kids this holiday season. The Colgate Kids Battery Toothbrush has a vibrating brush head to help kids brush better, while the manual toothbrush has a rounded handle and comfortable grip for when kids want to take the lead.

Colgate Sensitive Prevent and Repair Toothpaste
Sensitive teeth toothpaste that provides 24/7 sensitivity protection (with twice-daily brushing) and surface stain removal

Colgate Sensitive Whitening Toothpaste
Sensitive teeth toothpaste that provides 24/7 sensitivity protection (with twice-daily brushing) and surface stain removal

Colgate® Sensitive Complete Protection Toothpaste
Colgate® Sensitive Complete Protection Toothpaste provides 24/7 sensitivity protection with twice daily brushing and was developed to help protect against cavities, fight tartar and remove plaque with regular brushing.
Prescription Products

Colgate® PreviDent® 5000 ppm Enamel Protect (1.1% Sodium Fluoride, 5% Potassium Nitrate), Mint
Colgate® PreviDent® 5000 Enamel Protection is a high fluoride toothpaste formulated to strengthen teeth & enamel for a healthier smile. Contact your your dentist today!
ORAL HEALTH CHECK
What's behind your smile?
Take our Oral Health assessment to get the most of your oral care routine.
ORAL HEALTH CHECK
What's behind your smile?
Take our Oral Health assessment to get the most of your oral care routine.
Oral health topics
- Featured
- Whitening
- Gums
- Kids
- Cavities
- Sensitivity


Helping dental professionals

How we create healthier smiles for all
All of our science, expertise, knowledge of oral health, and our partnership with the dental profession and organizations is in service to helping everyone do the best for their smile and the best for the planet too.

SCIENCE & INNOVATION
Changing the world, one breakthrough at a time
Our team of scientific experts develop cutting-edge technology to create the best products and solutions for your smile.

Oral Health Commitment
Leading the way for healthy smiles across the world
Our goal is that every person not only knows how to care for their smile but also has access to oral care products and services.

Environmental Impact
We’re committed to reduce our environmental impact
We recognize the impact we have on the environment and do our utmost to protect the planet.